
Do you want to know How to set up Google Search Console for SEO? If not, then in this blog, we will discuss How to set up Google Search Console for SEO. Whether you’re trading products or promoting your brand new shopping blog, you’ll surely want to find ways to boost your site’s performance and organic search rankings.
The good news is if you invest consistent time and energy into improving your Website’s Search Engine Optimization (SEO), you’ll finally be compensated. However, SEO’s ever-developing nature can make it tough to know where to get started and where to see the most encounters.
Admiringly, Google Search Console provides us with a full suite of tools and reports designed to help you make meaningful SEO advancements. By measuring these performance reports, you will discover new information about your Website’s organic presence, page experience, mobile usability, and much more profound.
You’ll then be able to use this data to optimize your site and start ranking more advanced in search results.
Woohoo!
In this post, we’ll briefly tell what Google Search Console is and how to verify your Website in Google Search Console. Then, we’ll show you how to use this tool to improve your Website’s visibility or presence on Google. Let’s get started!
Google Search Console
It is also known as Webmaster Tool or Internet Master Tool. It is a free tool offered by Google Service that will help monitor and maintain your online Website’s presence or performance in google search results.
Why use Google Search Console?
- It helps in optimizing your Website.
- It also allows Google to access the contents you want to show.
- You have to submit new or filtered content for google to crawl, which will help index.
- The crawler will scan your content and fix any malware or spam on your Website.
- You have to submit a sitemap to google so that google knows all about your pages.
- Google search console monitors any security issues on your Website performance.
- You should use the google search console to perform your websites.
- You can easily view search keywords that you are ranking for.
- You can easily monitor your snippets and data.
- You can easily view backlinks pointing to your Website.
- You can constantly monitor your mobile website performance.
- You can always see how much Google is crawling your Website.
- You can view crawl errors on your Website.
How to set up a Google Search Console account
If you’re a new user of Google Search Console or GSC, you’ll need to figure out and verify your site(s) before you can do anything else. Adding and verifying your site in Search Console proves to Google that you’re either a site’s owner, webmaster, or another authorized user.
After all, Search Console provides you with all sorts of exceptionally detailed information and vision about a site’s performance. So naturally, Google doesn’t want to give that kind of information to anybody who asks for it. To set up Google Search Console for SEO, follow these steps –
Step 1: Sign in to your existing Google account
First, you must sign in to the Search Console with your Google account. For Google Search Console, you need a Google account for this method to work when we talk about the setup of Search Console. It’s free of cost too. You can use the same login if you already have a Gmail and Google Analytics Account.
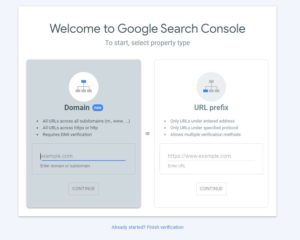
Step 2: Select your Property type
Now Enter your Website’s Domain or URL to add a property-Once you sign in or log in. You have the option to add a property type -Your domain or either a URL-prefix. We are using a domain which is recommended too.
Here we start with some definitions we are pointing to.
Domain
This is the name of your websites like http://www.yourcompanyname.com or http://www.yourcompanyname.in.
Subdomain
When an extension is added to a domain like www.yourcompanyname.com or hello.yourcompanyname.com.
URL
This is the address of a web page like www.yourcompanyname.com.
URL-Prefix
The protocol that appears in every link or Website before your domain. For example, HTTP:// (without SSL) or HTTPS:// (with SSL).
Search Console through the “Domain” option set up, sets your account at Domain Level Property. Now, this option connects every aspect of your site to Google Search Console. So now let’s talk about how to set up Google Search Console with Domain level property. First, enter your site’s root domain and then click continue.
By selecting URL-Prefix, it sets up a prefixed property. This means you are creating a single property for only one URL of your Website. Search Console can only be connected to one version of your site – not the whole thing -all protocols/subdomains – so that’s why it may not provide you exact or accurate data. But sometimes, you don’t have any other choice-only to accept URL-Prefix.
To set up a URL-Prefix property, first Enter the URL in the field and then Click or Press “Continue.”
IMPORTANT
For ensuring that Google Search Console provides you accurate data and not with URL or URL-Prefix property, create a Google Search Console (GSC) property for each or every one of the four URLs-
- https://yourcompany.com
- http://yourcompany.com
- https://www.yourcompany.com
- http://www.yourcompany.com
If you use other subdomains, you must create a property for each, like ecommerce.yourcompany.com or shop.your-company.com. At last, again, you will have to repeat the entire Google Search Console setup process for each of these URLs.
Step 3: Verify your Website on Google Search Console (GSC)
To perform Google Search Console and start gathering data, you need to verify that you own your Website. The verification process depends upon which option you chose in the previous step. Come to the instructions that apply to you:
- Verification for a Domain Property
- Verification for a URL-prefix Property
Verification for a Domain Property
There is only one way to verify a domain-level property: your DNS provider (or domain name system provider). So first, see if you can find your DNS provider (the company you pay to host your domain), which will display detailed instructions specific to your DNS provider.
For example, suppose you want to know how to use this method to set up Google Search Console for your digital marketing strategy. In that case, you might want to work with your developer or DNS provider. If you know your DNS provider, then choose, or you can leave it as it is.
Next, press the “Copy” button to copy the TXT record provided to you by Google, and this is important.
Once you’ve copied the TXT record, open your domain registrar’s site in a new tab on google chrome or Firefox (for example, GoDaddy, Bluehost, HostGator, Hostinger, etc.) and log into your account with them.
Operate to the list of domains you own and select the one you wish to verify. Next, find the option to manage your DNS records in your Website hosting server. Depending on your DNS provider’s Website, this will be located in different places on the hosting server (for example, GoDaddy, Bluehost, HostGator, Hostinger, etc. may have different locations for this option). Finally, look for any mention of “DNS” and press it.
For example, on GoDaddy, you would go to “First click on My Account -and then go to My Products- and select “DNS” next to your domain. You’ll then come to a Domain Management screen where you’ll find a list of your DNS Records and then Select “Add” to create a new one.
Select “Type” and choose TXT. Then, under “Host,” type in the @ symbol. Leave “TTL” at 1 hour. Next, and prohibited from that, most significantly, paste the TXT record you got from Google into the field for “TXT. Value”
Then press or click “Save.” And this will calculate a new TXT record for Google Search Console. (If you’re imagining, a TXT record is used to provide info about your domain to an outside source — e.g., you must think that you have shown Google that you own a domain-level property.)
The process shown above for GoDaddy is very similar for all domain providers. You can even use the same possibilities for “Type,” “Hostname,” and “TTL.” Some providers demand “TXT Record” instead of “TXT Value.” With your TXT record added, get back to the Google Search Console set up, and press or click on “Verify.”
If everything is perfect, you will see a message: OWNERSHIP VERIFIED.
Always Keep in mind updating DNS records can take up to 72 hours on every Website. Still, if your ownership isn’t verified, come back a few hours later or the next day and check again. If this still doesn’t work after 72 Hours and you want help verifying your domain, contact us. We’re happy to help you. In case, you need help from a specialist, you can contact us at askdigitalseo@gmail.com.
Verification for a URL-prefix Property
Always keep in mind to never mess with your DNS records. If you don’t have access to your registrar, you can set up Google Search Console using a URL-prefix property. This provides several alternative options for verification on Google Search Console or GSC.
Google recommends verifying through an HTML file. (But note it we are talking about URL-prefix properties. Ultimately, they suggest you create a Domain property, hopefully.)
Notice that there’s an option to verify through a domain name service provider. We already showed you how to do that above. But if you still want this method, you might as well create a domain-level property.
Let’s see how to verify through the other methods.
HTML File
For the HTML File method, you need to upload an HTML file to the root folder of your Website. It’s easy to do, but the drawback is you will need access to your server via FTP or a cPanel File Manager.
If you’re not familiar with cPanel File Manager or don’t have access to either, then don’t attempt to verify through this method. However, if you are convenient working with your Website’s server, here’s how you can verify your property using an HTML file method:
- Download the file provided by Google.
- Access the root directory of your site.
- Upload the file.
- Get back to Search Console, and select “Verify.”
HTML Tag
You need to add a meta tag to your Website’s <head> section to verify your property using the HTML tag method. You’ll need developer access to your site’s CMS for that purpose. For example- We’ll use here WordPress. There are two ways you can do this on WordPress:
- Add meta tag directly to your Header.php file, Or,
- Use a plugin to add to the header
More than likely, you’ll prefer option two. Because if you’re convenient working with the Header.php, you’re better off verifying property through an HTML file.
The steps to add the Google Search Console HTML tag to the <head> section of your WordPress Website by the use of a plugin are as follows:
- First, Copy the tag.
- Log into your Website’s WordPress admin in a new tab (google chrome or someone else).
- Install and activate the Headers and Footers plugin on your site.
- Come to Settings and Insert Headers and Footers by just clicking.
- Paste the Search Console meta tag in the “Scripts in Header” field.
- Get back to Search Console, and select “Verify.”
Google Analytics
If you have a Google Analytics account, Install a tracking code on your Website. You can follow the steps to get started with Google Search Console by verifying a User-prefix property. Open the Google Analytics verification box in Search Console and then press or click “Verify.”
If you want this to work, be sure you select “edit” rights in Google Analytics for the component whose tracking code is being used by that property. If you haven’t yet added a Google Analytics tracking code to your site, you’ll need to do that first.
Google Tag Manager
Regarding the Google Analytics verification method, you can verify with a single click if you are already using Google Tag Manager. Open the Google Tag verification box in Google Search Console and then press or click “Verify.” If you wish this to work, you need to have the Tag Manager fragment or snippet (a piece of code) already installed on your site and have acceptance for Tag Manager set to “Publish.”
Additional Google Search Console Setups
Depending on your CMS, there are other ways to generate or create a Google Search Console account. These include:
- WordPress
- Blogger
- Google Sites
Implement GSC on WordPress
We already told you how to verify the Google Search Console property on WordPress through an HTML tag and header plugin. But still, if you want to verify your Google Search Console property using your WordPress SEO plugins, then the two most popular and important SEO plugins (we can’t ignore them) are there-
- Yoast SEO
- All-in-One SEO
Now, let’s come on how to set up Google Search Console for SEO with each:
First, create a GSC account, add a URL-prefix property, and then Copy the HTML tag provided.
For Yoast SEO:
In your WordPress Dashboard, go to Yoast SEO settings, then General. Select the “Webmaster Tools” tab. Paste your HTML tag into the field for Google verification code and then press or click “Save changes.”
For All-in-One SEO:
In your WordPress Dashboard, go to All-in-One SEO settings, then General Settings. Next, paste your HTML tag into the field for Google Webmaster Tools and then press or click “Update.”
Note: Yoast and All-in-One will significantly stick the code, so only the tag ID shows after saving. Now, return to Google Search Console and press or click “Verify.”
Implement GSC on Blogger
Any new blogs created in Blogger are verified significantly in your Search Console account. (So when you log into Search Console with the same account used to manage your Blogger account, your Google Search Console account is verified)
If you have your older Blogger account, you can set up Search Console using the HTML tag method, as shown above.
Implement GSC on Google Sites
If you are using a new Google Site (created after 2016), verify it using the Google Analytics method, as shown above.
Use the HTML tag method if you use a classic Google Site (created in or before 2016) OR have a Google Site with a custom domain URL.
Next steps: Get Your Website Submitted
When we started with Google Search Console also meant getting familiar with the reports and the sitemaps submission tool. Now you know how to implement Google Search Console for SEO or set up Google Search Console for your Website. Indeed, if one of those methods isn’t working, or you want service setting up Google Search Console or GSC, we can advise you or assist you. You can contact us on askdigitalseo@gmail.com.
Now that you’ve set up your account and verified your Website, you might be fascinated: “how do I get my business listed in Google search results?” Well, that’s very natural. Once you’ve finished the setup, the consequent step is to submit your sitemap to Google Search Console or GSC.
Submitting your XML sitemap is the essential part. It is a key ranking factor for SEO, so you want to ensure you’ve done it correctly before any doubt.
You can generally find your Website’s sitemap by adding “/sitemap.xml ” to the end of your domain and visiting the file in your browser. If this doesn’t work, you may need to check your content management system or CMS settings to see if it is creating a sitemap for you. You can also check your “robots.txt” file. Make sure it is listed there.
In your Google Search Console account, operate to Sitemaps in the left side menu. You can add the URL for the position of your sitemap. Google can note the submitted URLs directly; your URLs should be mostly crawled and indexed after a few days!